Source review: 7 October 2026 · Global. Official references are linked under Sources. Service and event information is a dated snapshot; check the notice for subsequent changes.
AION 2 character creation lets you begin with a preset and then customize the character’s face, eyes, hair, makeup, skin, voice, and body proportions in detail. The safest approach is to establish the overall silhouette first, refine the face in a fixed order, and inspect the finished model under several preview conditions before confirming it.
The important limitation is that confirmation should be treated as consequential. Changing a finished character’s physical appearance later can require an appearance-change item instead of simply reopening the original editor for free. Spend extra time checking features that are difficult to judge from one angle, especially the jaw, nose profile, eye depth, body proportions, and hair around the ears and neck.
This guide covers the initial editor and the decisions needed to finish a new character. Community preset downloads, faction details, class builds, skins, and server-side creation restrictions are separate topics.
Choose from the eight Global classes before confirming. A role comparison can help narrow the decision; creation restrictions require a separate server check.
Prepare a Clear Character Concept
You do not need exact slider values before opening the editor, but a simple concept will prevent endless revisions. Decide whether you want a realistic face, a stylized fantasy appearance, or a character designed around a specific silhouette. Then identify two or three features that matter most, such as pointed ears, unusual pupils, a strong jaw, a compact frame, or a particular hair color.
Keep these practical points in mind before adjusting individual controls:
- Start with the closest complete preset rather than forcing a distant preset into the shape you want.
- Judge the face and body separately. A face can look finished while the head-to-body ratio still feels wrong.
- Make large structural changes before makeup, scars, tattoos, gloss, and color details.
- Check both the front and profile views after changing the jaw, nose, lips, forehead, or eye depth.
- Use the available lighting and outfit previews before final confirmation.
- Take your own screenshots of important settings if you want a visual reference later.
A preset is only a starting point. Characters built from the same base can still look substantially different once their facial geometry, colors, styling, and proportions have been changed.
Follow the Character Creation Order
A reliable creation order keeps later edits from invalidating earlier work:
- Choose the body presentation and the closest full-character preset.
- Set the skin tone, voice, and broad visual direction.
- Establish the head shape, jaw, cheeks, forehead, and ears.
- Adjust the eyes, brows, iris, pupils, nose, and mouth.
- Select the hairstyle and hair colors.
- Add makeup, facial details, scars, tattoos, or facial hair.
- Set height, build, head ratio, limbs, torso, and lower-body proportions.
- Inspect the result with different camera angles, lighting, and preview outfits.
- Continue to the class and name stage only after the appearance passes the final check.
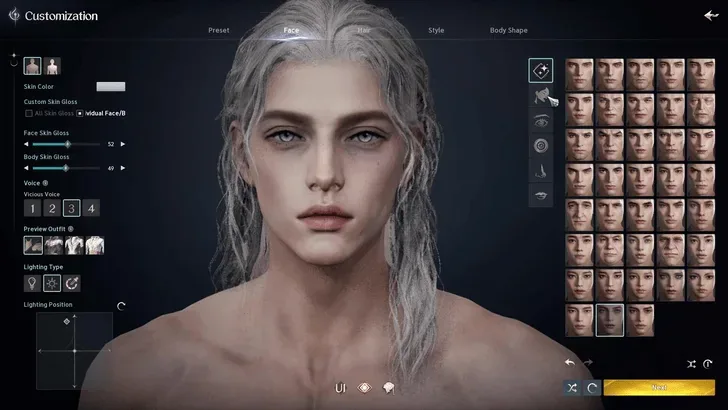
The editor groups presets with the main customization categories.
This order is useful because structural controls affect how decorative choices read. For example, eyeliner chosen before the eye shape is settled may no longer fit the finished eyelids. A tattoo positioned before the body proportions are complete may also appear different after the underlying model changes.
Choose the Body Presentation and Starting Preset
The first major choice establishes the character’s broad body presentation. It influences the body-shape controls and the way outfits sit on the model, so choose according to the finished silhouette you want rather than focusing only on the default face.
Next, compare the complete presets and pick the one that already matches your intended head shape, proportions, and general expression. Do not choose solely because its hair or makeup looks appealing; those elements can be changed later. A suitable structural preset reduces the number of sliders you need to correct.
After selecting the base, set the skin color and preview the available voice choices. Skin color should be checked under more than one light because highlights, gloss, makeup, and shadow can change how it appears. If you plan to use bright fantasy colors, inspect both the face and exposed parts of the body to make sure the result remains consistent.
Work at a useful zoom level during this stage. A close view helps with the face, but periodically return to a full-body view. The character will usually be seen at gameplay distance, so a design that works only in an extreme close-up may not produce the silhouette you expect while playing.
Shape the Face Before Adding Details
The face editor offers the greatest concentration of fine controls. Build it from large forms to small ones instead of jumping between unrelated tabs.
Establish the Head, Jaw, Cheeks, and Ears
Begin with the face or head-shape preset closest to your goal. Then adjust the forehead, brow area, cheeks, cheekbones, chin, jawline, and jaw protrusion. These controls determine the character’s underlying expression even before the eyes and mouth are refined.
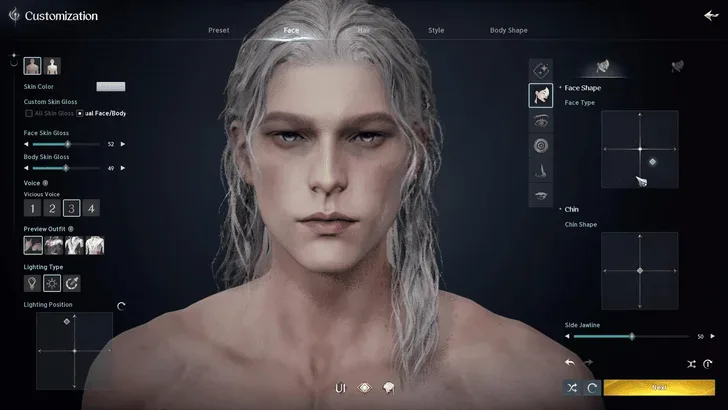
Structural face controls are visible beside the character model.
Rotate the camera after every major structural change. A chin that looks balanced from the front can project too far in profile, while narrow cheeks may look harsher from a three-quarter view. Check the jaw against the neck as well; the two shapes should read as one silhouette rather than unrelated parts.
Ear controls can alter size, position, angle, rotation, lobe length, and the degree of pointedness. Because hair may hide part of the ears, briefly test a hairstyle that exposes them. This makes it easier to see whether the ears intersect with the head or extend farther than intended.
Refine the Eyes, Brows, and Gaze
Eye controls include overall size and position as well as depth, rotation, corner placement, and upper- and lower-eyelid settings. Adjust the pair at a normal scale first. Extreme zoom can make tiny asymmetries feel more important than they will be during play.
Brows contribute heavily to the resting expression. Their shape, position, angle, color, and intensity can make an otherwise neutral face appear stern, worried, or surprised. Set the brows after the eye position but before decorative eye makeup so you can judge the expression without extra visual noise.
The iris and pupil options support fantasy shapes and colors, and the eyes can be made asymmetrical. Use asymmetry deliberately: compare both eyes in a front view, then zoom out to confirm that the contrast remains readable rather than looking accidental. Iris size, pupil shape, border color, and eye shine can all compete for attention, so one strong feature is often clearer than several extreme settings at once.
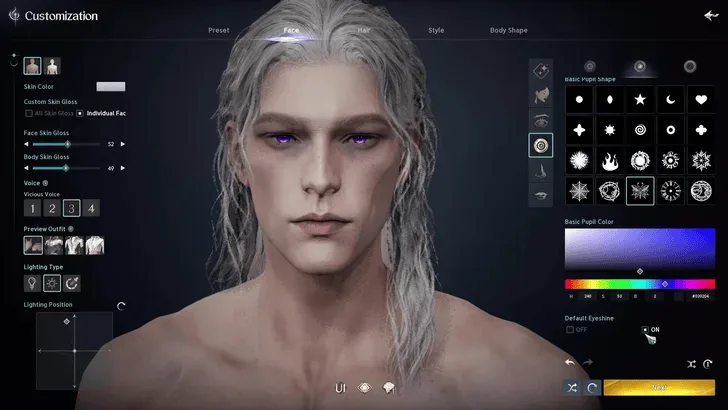
Eye appearance options are displayed alongside the preview model.
Balance the Nose and Mouth in Profile
For the nose, work from the root and bridge toward the tip and nostrils. Available adjustments include size, length, root position, bridge height, tip height and position, and nostril width or placement. Check the profile frequently because several controls can produce similar results from the front while creating very different side silhouettes.
For the mouth, compare the upper and lower lip widths and thicknesses before changing the corners. Lip angle, corner position, corner depth, and protrusion all affect the resting expression. Inspect the mouth from the front, profile, and three-quarter angles, especially if you have created a pronounced smile or pout.
Once the main facial geometry is stable, do one clean pass from the forehead down to the chin. Look for accidental extremes, intersections, or features that were changed indirectly while you worked on a neighboring area.
Finish the Hair, Makeup, and Surface Details
Choose the hairstyle only after the face shape is close to final. Hair changes how the forehead, jaw, ears, and neck are framed, so test several options even if you already have a favorite. Hairstyles are not restricted to one body presentation, which gives you room to choose based on silhouette rather than category.
Hair settings include color and gloss, with options that can create a two-tone result. When combining two colors, inspect the blend and distribution from behind as well as from the front. Strong gloss can look different as the lighting moves, so confirm it in more than one preview environment.
The Style controls cover finishing details such as contouring, eyeliner, eyeshadow, lipstick, beauty marks, freckles, face art, war paint, scars, tattoos, and facial hair. Depending on the selected detail, you may be able to change its color, intensity, position, size, rotation, reflection, metallic quality, or gloss.
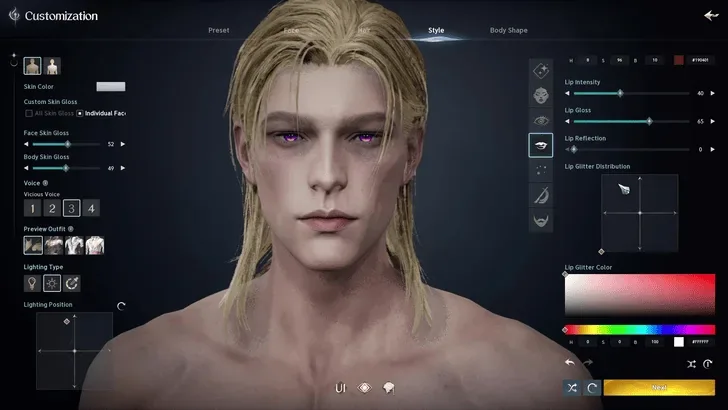
The Style category contains finishing appearance controls.
Apply these features in layers:
- Set broad skin and contour details.
- Add eyeliner, eyeshadow, or lip color that supports the existing face.
- Place small identity details such as freckles or beauty marks.
- Add scars, face art, war paint, or tattoos.
- Finish with facial hair when it is part of the design.
Check body art while the relevant area is visible. Some tattoos or paint extend beyond the face, and clothing can conceal placement problems. If the editor provides position, rotation, mirroring, or symmetry controls, inspect the result from both sides instead of assuming one view represents the entire design.
Avoid using decorative details to hide an unresolved structural problem. If the eyes still feel uneven or the mouth looks wrong in profile, return to those geometry controls before adding more makeup.
Set Body Shape and Proportions
Body customization begins with broad presets and then allows more detailed proportion changes. Establish height and overall build first, followed by the head-to-body ratio and neck. These large choices create the silhouette that will remain visible even when armor hides smaller details.
The arm controls can alter upper- and lower-arm length, overall thickness, individual muscle areas, hand size, finger proportions, and muscle definition. Torso controls cover areas such as shoulders, trapezius, rib cage, chest, back, abdomen, and waist. Lower-body controls include the hips, thighs, calves, feet, leg length, thickness, and muscle definition.
Use a full-body camera and make changes gradually. It is easy to overcorrect a single area while zoomed in. After changing the arms, compare hand position against the hips. After changing leg length, check the full height and torso balance. After altering the head size, revisit the shoulders and neck because those features are judged relative to one another.
Preview more than one outfit if the option is available. Clothing can change the apparent width of the shoulders, waist, hips, or legs, while bulky armor may conceal the underlying body shape. The preview is therefore a compatibility check, not a promise that the displayed equipment will be your starting gear.
Preview the Finished Character Before Confirming
A final inspection should test the character rather than merely admire the front view. Use a repeatable review so you do not overlook a feature after spending a long time in the editor.
Run a Visual Inspection Pass
Check the character in this sequence:
- View the face directly from the front and check alignment.
- Rotate to both three-quarter views and compare the cheeks, jaw, nose, and lips.
- Use a full side profile to inspect forehead, eye depth, nose projection, lips, and chin.
- Zoom out to normal character distance and judge the complete silhouette.
- Change the lighting direction or type and recheck skin, makeup, gloss, and hair.
- Test preview outfits to find clipping or proportion choices that look different when clothed.
- Lift or move the hair when that preview control is available so the ears, neck, and face outline remain visible.
- Hide the interface briefly if possible and make sure the overall design still reads clearly.
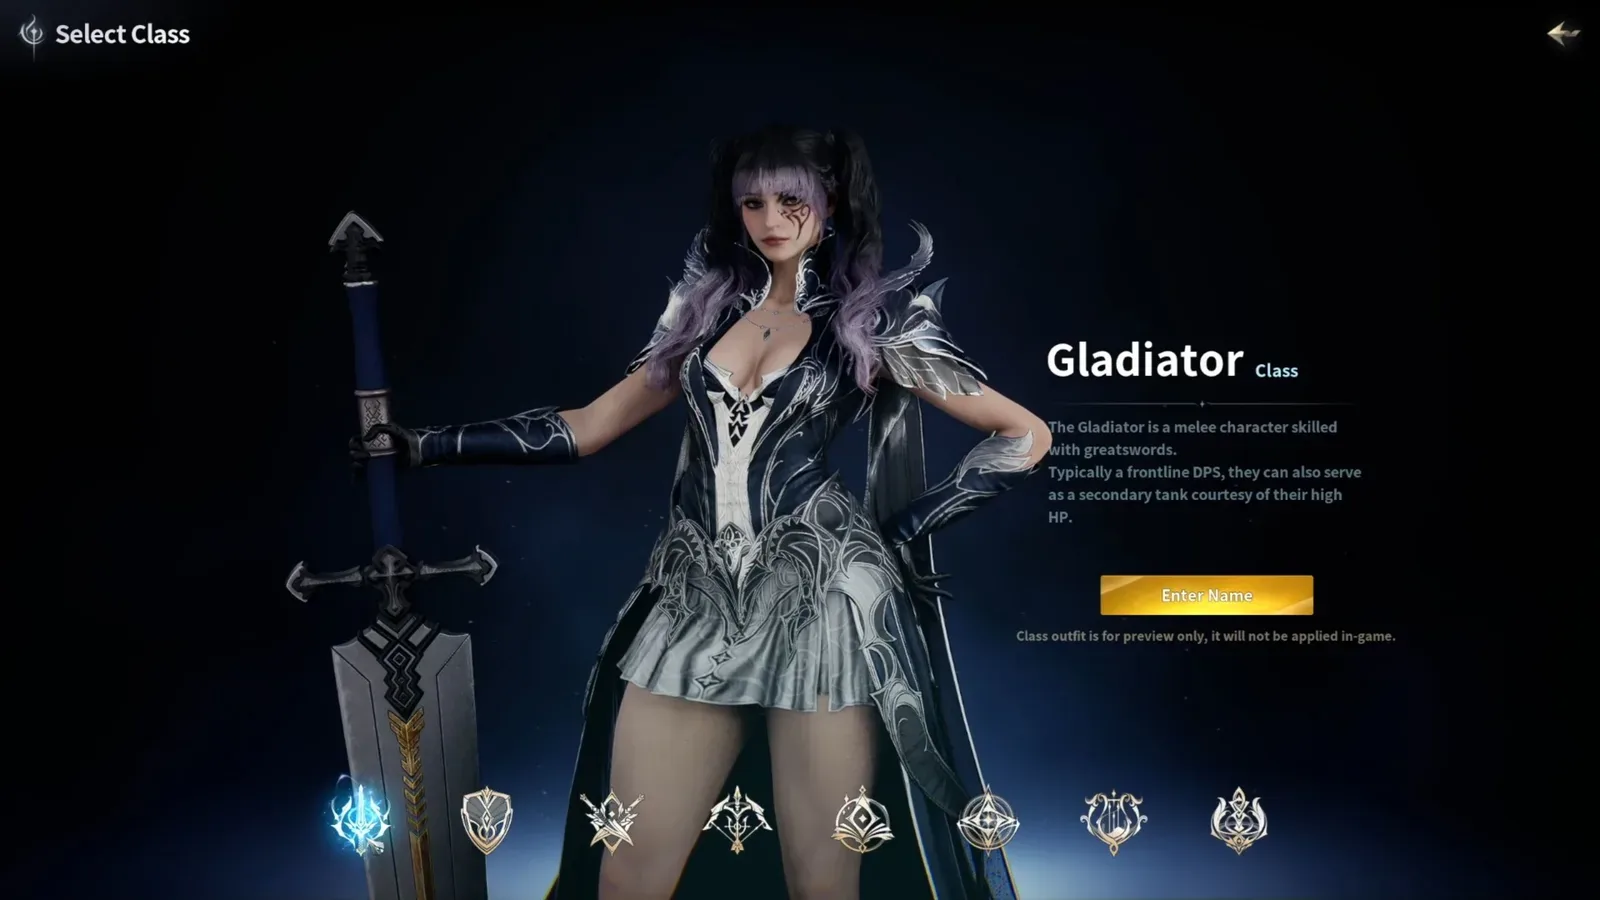
Review the finished character before entering a name and confirming the class.
Do not rely on a single dramatic light. Strong side lighting can exaggerate the nose and jaw, while flat lighting can hide depth problems. The character should remain recognizable under both bright and neutral conditions.
Check Colors as a Group
Review skin, eyebrows, eyelashes, irises, pupils, hair, makeup, tattoos, and facial hair together. Each color can work independently but clash when combined. If the face has several saturated colors, reduce one element and check whether the main focal point becomes clearer.
Gloss and reflection deserve their own check. High values can make hair, lips, makeup, or skin look very different when the light moves. Rotate the light or model rather than judging these settings from a static camera.
Preserve a Personal Reference
Before confirmation, capture screenshots of the finished front, side, three-quarter, and full-body views. If particular settings are important to you, capture those editor panels too. These images do not guarantee that the editor can restore the character automatically, but they provide a practical visual record if you later want to recreate or compare the design.
Complete Class and Name Selection
After the appearance is finished, continue to class selection. The current Global launch lineup contains eight classes: Gladiator, Templar, Assassin, Ranger, Sorcerer, Spiritmaster, Cleric, and Chanter. The selection screen can show the character in elaborate class-themed equipment, but that preview should be treated as a visual presentation of the class rather than the character’s guaranteed starting appearance.
Class choice affects gameplay far more than facial or body customization, so do not select one purely because its preview armor looks best. Use the dedicated class guides when deciding combat role, range, support responsibilities, or build direction. Character creation only needs you to verify that your appearance still works with the class preview.
Enter the intended character name carefully and review every confirmation screen. If creation is blocked by a server or account restriction, do not repeatedly rebuild the appearance under the assumption that a facial setting caused the error. Preserve your screenshots, read the exact restriction message, and address that separate account or server condition first.
Avoid Common Character Creation Mistakes
The most common problems come from editing in the wrong order or checking the model under only one condition:
- Starting from a distant preset: This creates more corrective work and makes it harder to keep the face coherent.
- Adding makeup too early: Later eye, cheek, or lip changes can make the original styling unsuitable.
- Ignoring the profile: Nose length, jaw protrusion, chin depth, and lip projection may look balanced from the front but extreme from the side.
- Editing only at maximum zoom: Fine details may look good close up while the complete character loses a readable silhouette at gameplay distance.
- Using one light: Skin, gloss, hair dye, metallic paint, and reflective makeup can change substantially with lighting.
- Judging body proportions without clothing: Outfit previews can reveal apparent proportion problems or intersections hidden in the unclothed model.
- Assuming preview armor is starting gear: Class presentation equipment illustrates a possible look and should not define your expectations for the opening character.
- Rushing confirmation because changes seem reversible: Later appearance changes can require a dedicated item, so perform the complete review before proceeding.
- Copying old regional assumptions: The current Global version is a Windows PC release through Steam and PURPLE, while older Korea and Taiwan material may describe different events or later systems.
Your character is ready to confirm when the face works from front and profile views, the silhouette remains balanced at normal distance, colors hold together under different lighting, and the design still looks intentional in more than one outfit preview.
Sources and verification
- Official AION 2 class showcase — Official: the eight class identities; no measured class ranking.
- AION 2 Global launch FAQ — Official: platforms, shared servers and account boundaries.