
The AION 2 Global interactive map on Gaming Tools provides region selection, marker filters and local progress tracking. Ctrl-click a marker to mark it; that progress is saved in the current browser only.
Open the Global interactive map.
This guide covers choosing and using a map tool as of October 10, 2026. It is not an interactive map embedded in this article and does not supply a new coordinate database. Use the external tool for the live marker locations, then use this workflow to avoid clutter, choose a useful route and keep manual completion records distinct from your character's actual progression.
Choose the map for your service and faction
Open the tool labelled AION 2 Global Interactive Map on Gaming Tools. The Global label matters because Korea and Taiwan have later regional content. A map published for an older service can provide useful context without being a complete statement of what the Global client currently contains.
Choose the region that matches your current character and destination. Elyos progress into Verteron after their starting area, while Asmodians use Altgard. Other map tools also present regions such as the Abyss. Do not plan a local collection route from the wrong faction's map merely because the first view loaded successfully.
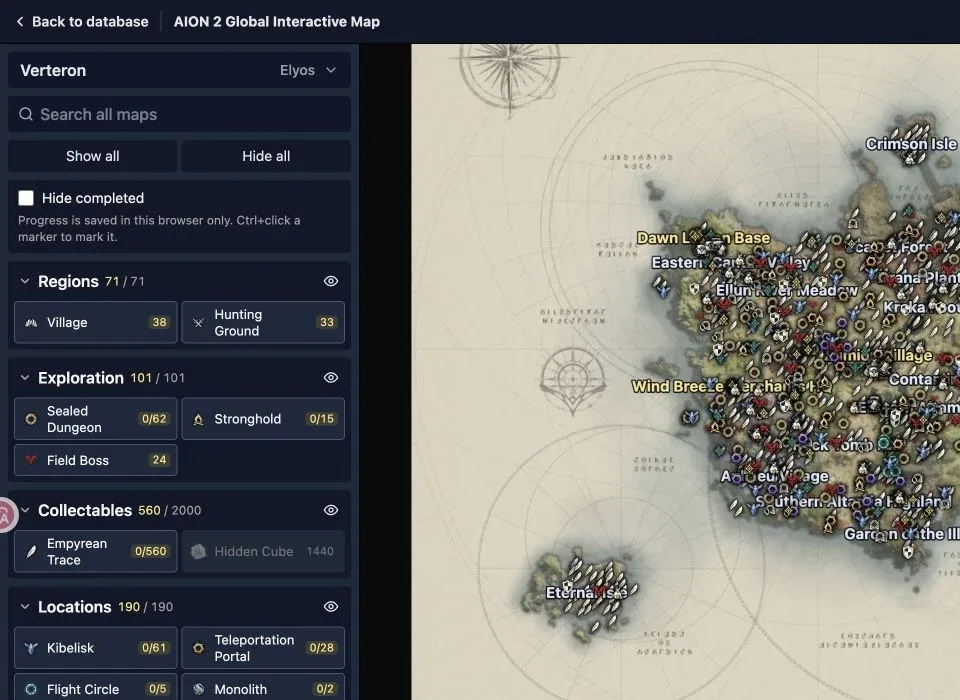
The map explicitly saves manual completion in the current browser and uses Ctrl-click marking.
The pictured Global tool is showing Verteron with Elyos selected. Its left panel contains filters and completion controls, while the map contains the corresponding markers. The correct starting point is the region selection; a large collection count on a different map does not help you identify the area you are currently exploring.
When comparing another tool, check whether its map actually loads, which regions it presents and what it says about tracking. A page titled interactive map can still contain a failed embed or only a description. Evaluate the functioning map rather than assuming every search result offers the same capabilities.
Start with a single objective
Decide what you want to accomplish before enabling markers. An Empyrean Trace sweep, a Hidden Cube route, a Sealed Dungeon visit and a trip to an Alchemy Table use different information. Showing everything at once can obscure the marker that matters and make the map harder to translate into a short in-game route.
Use Hide all as a clean starting point, then enable the category you need. Add a small number of supporting location markers if they help with travel. For example, a collectible route may benefit from Kibelisk or Teleportation Portal locations, but it usually does not need every monster, quest NPC and merchant displayed at once.
Show all is useful when you are surveying a small area or want to understand which categories overlap. It is less useful when the screen becomes covered in symbols. Switch back to a focused view if you cannot distinguish the destination you intended to select.
Treat the current filter choice as a task view rather than a permanent configuration. Once you finish a collectible sweep, change the filters for the next objective. Reusing a crowded collection view to find a crafting station creates unnecessary visual work and increases the chance of following the wrong symbol.
Understand the marker groups
The tool separates Regions, Exploration, Collectables, Locations, Services, NPCs, Monsters and Gathering. These headings describe different kinds of points. A regional label is not a collectible, and an enemy marker is not a service NPC even when they sit near each other on the map.
Exploration includes categories such as Sealed Dungeon, Stronghold and Field Boss. Collectables includes Empyrean Trace and Hidden Cube. Locations includes travel and entry points such as Kibelisk, Teleportation Portal, Flight Circle, Dungeon and Spacetime Rift. Use those labels to decide which symbols belong to the route you are planning.
Services includes merchants, storage and crafting tables. NPC filters distinguish quest-related and other NPC entries. Monster views can narrow enemies by rank or creature type, while Gathering includes resource categories such as Herb, Ore, Gem, Odyle and Aquatic Life. Select the type you actually need rather than a visually similar marker.
Counts in the panel describe the tool's current dataset and selection. They are not automatically the reward threshold or collectible requirement in your client. They can also change as the database changes. Use the in-game progression interface for the condition that grants your character a benefit; use the map to find candidate locations.
Plan a short route you can verify
Begin near your current position or a travel point you can reach. Pick a compact group of relevant markers instead of drawing a route across the entire region. A shorter sweep is easier to compare with the terrain and easier to recover when one location is inaccessible or already completed.
Use visible landmarks and travel locations to orient the route. Compare the external map with the in-game map before moving to the next marker. A straight line on a two-dimensional map does not prove that the terrain supports a direct path. Cliffs, structures, elevation and encounter areas can change the practical approach.
Choose a clear stopping point, such as the last nearby collectible or a return to a service location. That keeps the route useful during a short session and prevents it from expanding indefinitely whenever another marker appears. If you discover a side objective, decide whether it fits the current task or should be saved for another view.
At each destination, verify the actual game object or objective. The marker is a navigation aid, not evidence that you collected anything. If the location differs from what you expected, compare the region and category first, then inspect nearby elevation and access rather than marking it complete to remove it from the screen.
Mark completion only after the game action
The Gaming Tools map explicitly instructs Ctrl-clicking a marker to mark it. Use that action after completing the corresponding objective in the game. The map's completion state is manual tracking; it does not automatically read your character, inventory or quest progress.
Enable Hide completed when you want a focused view of the remaining marked objectives. If a marker disappears after you mark it, check that setting before assuming the map lost the point. Temporarily show completed entries when you need to review an earlier route or compare your record with another character.
Do not mark a location complete merely because you passed nearby, opened its marker or discovered that the route was inconvenient. Keep completed, visited and unresolved concepts separate in your own notes if they matter. The tool's visible instruction establishes a completion toggle, not a universal system for recording every kind of status.
When an incorrect mark needs correcting, inspect the tool's current marker behavior and restore the state using the supported completion action. Confirm the visible result afterward. Avoid making assumptions about cloud synchronization or account-level recovery that the tool does not claim to provide.
Preserve the browser context for tracking
The tool states that progress is saved in this browser only. Treat the browser and profile you use as part of the tracking workflow. Opening the map in a different browser, another profile or another device should not be assumed to show the same completion record.
This also means your external map record is separate from game-account progress. Two characters sharing one browser can create an ambiguous record if you mark both on the same view without keeping track of which character completed what. Before a new character's sweep, decide whether you are using the existing record as a route reference or expecting an independent completion list.
Keep important session notes outside the map when losing manual tracking would be inconvenient. A brief note of the area and last verified objective can help you resume even when browser-local state is unavailable. Do not describe that note as an export file supported by the tool; it is simply your own record.
Browser cleanup or a change of profile can affect locally stored information. The available tool text does not establish a cloud backup, import feature or automatic restore process. If you need those capabilities, inspect the current tool for explicit support before relying on them.
Use service and gathering filters efficiently
For a crafting errand, enable the relevant table category and enough location information to travel there. Blacksmithing, Armorsmithing, Handicrafting, Alchemy and Cooking are separate services. Finding one table does not prove it supplies the function of another. Check the in-game service when you arrive.
For storage or purchases, use Storage Manager or Merchant rather than leaving every resource marker visible. A focused services view can make a short town visit easier to plan. Add another service only when it belongs to the same errand, then clear the view when you return to exploration.
For gathering, enable the resource category you need and compare a compact cluster of nodes. Avoid treating every displayed node as a promise that the resource is currently available. The map shows recorded locations; the actual game determines whether you can gather at the moment you arrive and whether your character meets the relevant conditions.
A mixed gathering route can be useful when the categories are visually distinguishable. If the view becomes crowded, separate the task into two passes. The purpose of filters is to reduce uncertainty during travel, not to display the maximum possible amount of information.
Handle missing or unexpected markers
If a marker seems missing, check the selected region, category visibility and Hide completed setting first. Those controls can remove an otherwise valid point from the current view. Zoom and compare the visible area before assuming that the database has no entry.
If a marker appears in the tool but the object is not obvious in the game, confirm your position and look for different elevation or an entrance. Do not substitute a random nearby object simply to satisfy the route. A marker can also be incomplete or outdated; use the actual game and current regional context to evaluate the mismatch.
When the whole map fails to display, distinguish that failure from missing individual data. An embed-loading message does not prove there are no collectibles in the region. Try the functioning Global tool or follow the page's own reload guidance, then resume once the map itself is visible.
For a useful report to a tool maintainer, identify the region, marker type and observed mismatch. Avoid sending account credentials or private game files to prove a public map issue. A clear description of the point and what you found provides more relevant information than an unsupported claim that the entire tool is wrong.
Finish with a reliable record
At the end of a route, compare your last few marked points with the objectives actually completed. Note any unresolved destination rather than treating it as finished. Clear or adjust filters for the next task so that returning to the map starts from an understandable view.
The dependable workflow is region first, one objective, focused filters, a compact route, in-game verification and manual marking. Keep the browser-local record separate from your character's real completion state. With those boundaries clear, the AION 2 interactive map becomes a practical exploration aid instead of a crowded screen that appears to know more about your account than it does.
Sources and verification
Reviewed for Global on October 10, 2026. Gaming Tools is an independent map provider. Its browser interface was checked for filters and local progress marking; manually marked completion does not synchronize with the game.